
Week 1 / Passing of Time

DAY ONE / JULY 31ST
Title: Flowering Time
Technique: Photography
Reasoning: After noticing that my flowers had lasted two weeks already, I knew they were going to start dying soon so I decided to capture the change that five days had on the flowers.
Process: I used my new 550D DSLR camera to take the two photos, five days apart from each other. I then took the photos into adobe photoshop where I removed the shadow in the photo using the stamp tool and then took the two into adobe lightroom where I increased the brightness and purple hue of the photo.
Reflection: I decided to place the two photos side by side to emphasis the change in the flowers over time. I found it difficult to keep the flowers/camera in the exact position over the five days.

Day Two / August 1st
Title: Phase by Phase
Technique: Hand Drawing
Reasoning: The idea for this drawing came from wearing my moon crescent earrings, which made me think about the different shapes the moon portrays overtime.
Process: I used a compass to draw the circular shapes, starting with the middle circle first. From there I then draw an outline of the shape for each different phase, followed by shading in each of these shapes. I then took this sketch into adobe lightroom where I increased is quality by increasing the brightness and reducing the noise.
Reflection: One of my goals for this one per day project is to improve my drawing skill, so I chose to do this as a hand drawing as it was quite simple.

Day 3 / August 2nd
Title: Counting Down the Days
Technique: Hand Drawing & Photography
Reasoning: I got the idea of this drawing from my excitement that my friend has been in London for just under a year is coming home tomorrow.
Process: Used a combination of 2B and 4B pencils for this sketch. When taking the photo of this drawing, I put the 1 as the focal point which created a slight blur for the surrounding numbers.
Reflection: The drawing is pretty simple itself, but the way that I photographed the drawing is a bit more creative than just taking a normal iphone photo or simple scan.

Day FOUR / August 3rd
Title: The hour of life
Technique: Adobe Illustration
Reasoning: What i wanted to portray with this image is that just like an hour glass, our lifetime will eventually run out. The silhouettes of the different aged people, represent the different stages of life I have been through (child), I am in currently (the adult) and will pass through (the older woman).
Process: This image was created in illustrator using predominately the pen to get the base outline of the image and direct selection tool to alter this outline to make it smoother. The glass container was given a lighter opacity to give it a see through look.
Reflection: I think the idea behind this image is pretty creative, but the illustration itself is quite simple. If I had more time for this illustration, I would add more detail and colour into the illustration.

Day FIVE / August 4th
Title: Play by Play
Technique: Photography
Reasoning: For this image I wanted to capture the different moments in time that make up the blink of an eye that is a lay up.
Process: Took the series of photo using my canon 550D DSLR camera on the sports mode, using a continuous shooting mode. I then took this serious of images into photoshop, laying the next photo in the series over the previous with a lighter opacity.
Reflection: I think the photo would have been more effective if the pictures of my boyfriend would have been darker and more obvious, however I couldn't figure out how to do so.
Week 2 / Portraits
Day SIX / August 7th
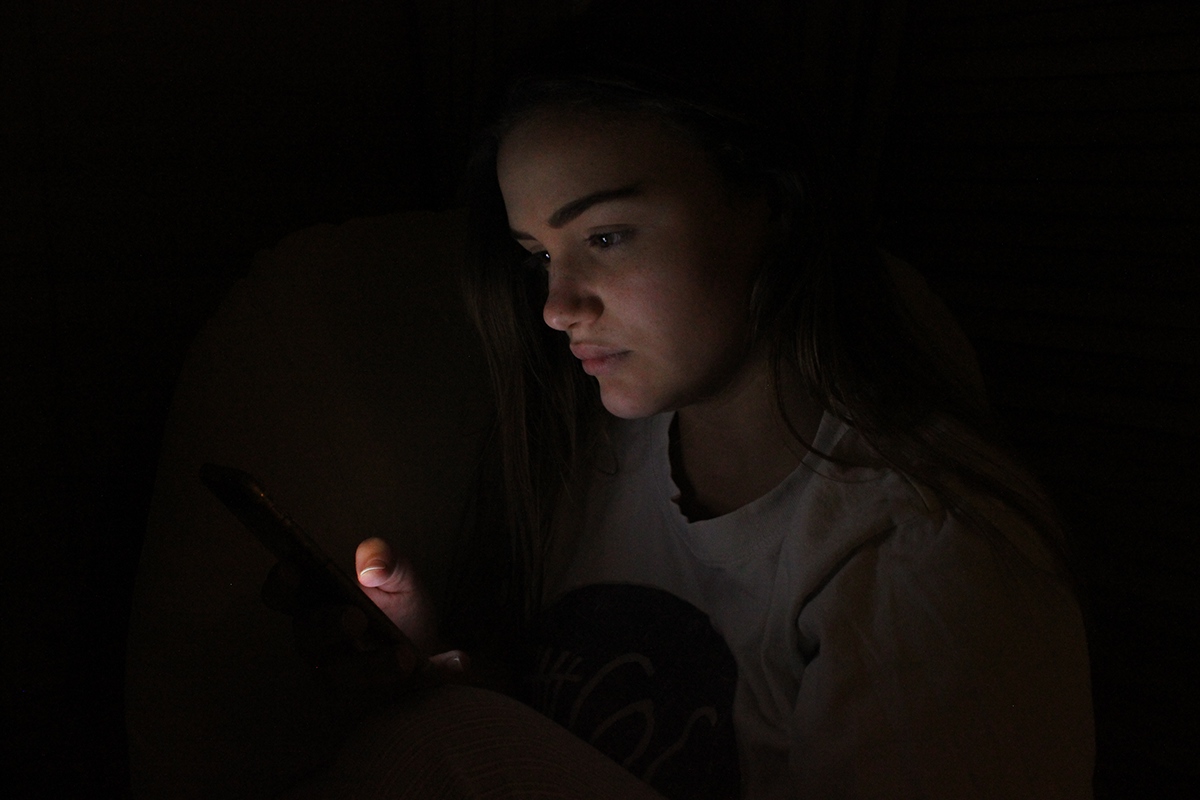
Title: Technology Generation
Technique: Photography
Reasoning: I wanted this portrait to portray the ideology that new generation of teenagers are so invested in technology. I got this idea from trying to talk to my sister about her day at school, but instead she chose to ignore me and remained focused on her phone.
Process: I took the photo with my DSLR camera on the no flash setting. in terms of lighting, I turned all the lounge room light and used the brightness of my sisters iphone screen to slightly light up my sisters face in the photo.
Reflection: I wasn't sure how well this photo was going to turn out as it was quite experimental, however after only a few tries I got the perfect shot.

Day SEVEN / August 8th
Title: Two Sides to a Stranger
Technique: Photography
Reasoning: This photo plays on the ideology of judging a book by its cover by portraying two different sides or views of a stranger by portraying them in two very different lights. The brighter photo portrays the stranger as a happy friendly person you could bump into on the street whilst the dark photo portrays the stranger as scary and someone you wouldn't want to bump into in an alley way.
Process: Photo was taken using the portrait setting on my DSLR camera and then taken into adobe light room where the exposure and brightness of the photo were adjusted.
Reflection: The adjustment of the photos brightness in adobe lightroom was done quite well however I think I could have used a more creative way yo put the two images together instead of a single white line.
Day Eight / August 9th
Title: Classmate in Thought
Technique: Photography
Reasoning: The original reasoning behind this photo was to play around with the different types of lighting in class. I however took the original photo and adjusted the green background with a grey colour to portray the classmate in a more serious setting as I thought he looked as though he was deep in thought.
Process: Green room photography using my Cannon DSLR camera and playing around with side lighting. The photo was then taken into adobe lightroom where the green saturation was turned completely down, replacing the green backdrop with a grey colourless backdrop.
Reflection: There are still some tiny bits of green surrounding the classmate in the photo which I couldn't get rid off but probably should have.

Day Nine / August 10th
Title: Myself in Reflection
Technique: Photography
Reasoning: I used the opportunity of topic of a self portrait to experiment with the effects of lighting in terms of a reflection in something. I chose to do this in a computer screen as a lot of my life/skills area resolves around sitting in front of a computer screen as working as a graphic designer.
Process: Took this photograph using the portrait setting on my DSLF Cannon camera, without the flash. Then took the photo into adobe Lightroom where I changed the photo to black and white before playing around with exposure and highlight settings to blur/lighten the background behind the computer, to make the reflection itself the focal point of the picture.
Reflection: It proved very difficult to find the right natural lighting for this photo as when there was to much lighting it would produce a glare across the screen and when there wasn't enough lighting you weren't able to see the reflection in the screen. I should have also cleaned the screen before taking the photo.

Day Ten / August 11th
Title: My Childish Side
Technique: Hand Drawing
Reasoning: Visiting the markets on the weekend, I walked past an old man who was offering cartoon sketches of people for money. This gave me the idea to try this type of drawing for myself for my self portrait. I also liked the fact that cartoons are generally for kids, so in a way it represents my strong childish side.
Process: Got inspiration for this drawing from cartoon drawings online, and did my own sketch with using these photos as a reference point. I firstly did a rough sketch using a HB pencil, slowly adding more detail and increasing my pencil weight. Once I was done I used the smudge technique for the hair & eye.
Reflection: By choosing to do a cartoon sketch, it meant that I had a lot of leeway when drawing my different features which I found helped a lot with my lack of drawing ability.
Week 4 / Documenting the Ekka

Day ELEVEN / August 14th
Title: Waste of Money
Technique: Photograph
Reasoning: Today as a young adult, with more financial independence, my view of the Ekka has shifted from this must attend event of the year, to something that is the biggest waste of money. Being a university student, I have more practical ways to spend my money such as on petrol, food and bills.
Process: Photography using my DSLR Camera. Brightened and increased photos highlights/whites in adobe lightroom.
Reflection: I chose to do this photo in terms of photography and use real money to portray the fact that the money is real and something that we earn.

Day twelve / August 15th
Title: Ekka in Simplicity
Technique: Illustration in Adobe Illustrator
Reasoning: When I think of the ekka, one of the first things they think of is the ferris wheel and the second is a carasoul.
Process: Firstly created the structure of ferris wheel using circular and rectangle shapes and using different stroke weights. Using the pen and ellipse tools, then created the carriages.
Reflection: I tried to keep the illustration of the image quite simple to represent the fact that these two rides are the first thing I think of when I think about the ekka but I think instead it just makes the image boring.

Day Thirteen / August 16th
Title: My First Ever Ride
Technique: Drawing
Process: Drawing using mixtures of different weighted pencils. Took the photo into adobe light room and increased noise reduction luminance and brightness to give the photo a memory look.
Reasoning: This was the first ride I ever want on as a child at the Ekka.
Reflection: This picture isn't as captivating as some of my other pictures as I am not the best drawer. However I am trying to do one sketch a week to improve my drawing skills. It's a start to say the least.

Day fourteen / August 17th
Title: No Age on Showbags
Technique: Photography
Reasoning: Despite thinking the ekka is a waste of money, my inner child always comes out when it comes to Show bags. I don't know what it is about show bags, but its something I never want to miss out on despite not actually attending the Ekka. I'm alway asking around to find someone that is willing to buy me a show bag or five!
Process: Photography using my DSLR camera on the full auto mode. The background of the photo was removed in adobe photoshop and replaced with a white background to add emphasis to the detail on the show bags.
Reflection: By replacing the background with a solid white colour, it changed the whole look of this image and helped to illuminate the focus on the showbags.

Day fifteen / August 18th
Title: Only One That Matters
Technique: Adobe Illustration
Reasoning: Decided to create an illustration of my favourite show bag from when I was a kid.
Process: Created this illustration using an online photo of a kit kit show bag as reference. The illustration was created mainly using the pen and ellipse tool.
Reflection: I think this image could have been more creative if it was hand drawn rather than done as an adobe illustration. Whilst the show bag looks very realistic, the image isn't very captivating and doesn't have much character.
Week 5 / Down Memory Lane

Day Sixteen / August 21st
Title: Kirkby Kubby
Technique: Drawing
Reasoning: My sisters and I would spend hours playing in this cubby house. I spent so many hours in there that to this day I can still remember exactly how it looked. The background of the image isn't as detailed as the cubby itself, as my memory on where it was isn't so clear as it moved around the yard so much.
Process: Drawing from memory using a mixture of Hb, 2B and 4B pencils.
Reflection: Whilst this is probably the best drawing i have ever done, it did take me more than four hours to complete. However it has shown me that I can create good drawings but that just take a long time.

Day SEVENTEEN / August 22nd
Title: The Floor is Lava
Technique: Drawing
Reasoning: Having four siblings and not much money, this was always our go to game as it was based mainly on our imagination.
Process: Drawing using a mixture of pencils and coloured fine point pens. The diagram was then pasted onto some coloured cardboard.
Reflection: The diagram itself turned out a bit boring, but I think by pasting it on coloured cardboard and adding a creative title in, it makes the image a bit more captivating.

Day EIGHTEEN / August 23rd
Title: No Surprise
Technique: Illustration
Reasoning: All throughout my teenage years and still to this day, my favourite chocolate has been a kinder surpriser, in particular the egg. Whenever I am out and about and feel like a little bit of chocolate, this is always my go to.
Process: Illustration in adobe illustrator based on an a physical kinder surprise egg. This was done mostly using the pen tool.
Reflection: I originally took a photo of a kinder surprise egg but then thought that I had to many photos and decided to do an illustration instead.

Day NINETEEN / August 24th
Title: Picture Perfect House
Technique: Photography
Reasoning: As we are currently looking for a new house to live in, I took a photo of the house I currently live in (and started at QUT in) through a frame to illustrate the fact that the house is soon going to become just a memory to me.
Process: The two pictures were taken separately using my DSLR canon camera using the landscape setting. One of the photos was then put on top of the other in line with the frame in photoshop.
Reflection: I originally tried to take the photo of the house through the frame but soon realised that this wouldnt work as the camera focused on the frame and blurred the house out to much.

Day TWENTY / August 24th
Title: Cloudy Vision (2:48pm)
Technique: Photography
Reasoning: I wanted to capture a picture of the sun, however found this difficult as you cant look at the sun for too long. I waited a while for the clouds to cover the sun so that I could capture a photo and it turned out more visually appealing that I thought.
Process: Photography using my DSLR Canon Camera.
Week 6 / See That Thing

Day TWENTY ONE / August 28th
Title: Italian Gondola
Technique: Photography
Reasoning: Mums table decoration was the first perfect example for this weeks photo. My mum first pointed out that it looked like a banana, but after looking at it for a while I thought it looked like a boat, and then with further thought one of those Italian boats.
Process: Photography using my DSLR Camera on the full auto setting. I then took the photo into adobe photoshop where I overlayed a picture of water over the top of the background.
Reflection: I think by adding the water overlay into the photo, it makes the object move visually portrayed as a gondola.

Day TWENTY TWO / August 29th
Title: Mother & Daughter
Technique: Photography
Reasoning: When you look at the shape of the pots, they somewhat resembles the shape of a woman's body wearing a dress. The straw side handles resemble the woman's arm which are placed on her hips. The straw detailing on the pots acts as detail for the dress.
Process: Photography using my DSLR Camera on the full auto setting.
Reflection: I think this photo is really cool once you notice the mother and daughter.

Day TWENTY THREE / August 30th
Title: Funky Caterpillar
Technique: Photography
Reasoning: After untangling my mums molecule structure I notice the resemblance of a caterpillar figure. I thought it somewhat resembled a child's caterpillar toy.
Process: The photo was taken using the close up setting on my DSLR Camera.
Reflection: The first photo that I had taken of this object, the background was too busy. I tried to just remove the objects in the background of the photo with the stamp tool however this didn't work too well. So instead I just want back and moved the caterpillar to as location that was less busy.

Day TWENTY FOUR / August 31st
Title: Giant USB Holder
Technique: Photography
Reasoning: I originally thought the toaster resembled a radio but after looking at this picture for a while I noticed the distinct USB holder shape.
Process: Toaster was turned onto side and photo was taken using the normal setting on my DSLR Camera.
Reflection: To improve the image quality, I should have moved the toaster so that the background wasn't so busy.

Day TWENTY FIVE / September 1st
Title: Angry Robot
Technique: Photography
Reasoning: I was sitting in my car stressing about not have taken my photo for today when I realised the perfect picture was right in front of me. By turning my air vents to the sides, it gave the car dash an angry robot look as captured in the picture.
Process: Photo was taken using the normal setting on my DSLR Camera. Photo was then taken into Adobe Light Room to darken the edges of the images and increasing the saturation of orange colour.
Reflection: The only challenge that I had with this photo was that I had to wait until night time to take the photo so that it wasn't to bright.
Week 7 / Light & Scale


Day TWENTY SIX TO THIRTY / September 4-8th
Name: Lifesize in Nature
Technique: Photography
Reasoning: When looking for inspiration for this weeks topic of scale, I looked at existing work out there for photographing toys at a larger scale. One photographer that I came across was Sharon Wright, a photographer that focuses on photographing dolls as life size. I thought it would be cool/fun to play around with scale by photographing these miniature Bratz dolls from my childhood as if they were actual human size, doing human activities.
Process: Using my DSLR cannon camera I photographed these two dolls in different situations where they appear as human size. To do this I played around with the positioning of the camera, taking the photos up very close and from a low angle. To give the dolls this large scale effect, it was important to make sure there was minimal detail in the background of the photo.
Reflection: I found this week really fun as this was something I have never done before. I think all of the images turned out quite well in portraying the dolls as ordinary size. I think it would have been better if I had changed the dolls clothes between the different photos.
Week 8 / Textures & Patterns

Day THIRTY ONE / September 11th
Title: Texture from Nature
Technique: Photography
Reasoning: I thought this wood texture looked pretty cool as it is quite random.
Process: Photography using my DSLR cannon camera using the close up manual setting.
Reflection: It would have been nice to get a closer up photo however any closer and the camera would not focus.

Day thirty Two / September 12th
Title: Manmade Texture
Technique: Photography
Reasoning: I thought this was an interesting texture as from a close up view, the door matt almost looks comfy like a rug.
Process: Photography of a door matt using my DSLR cannon camera using the close up manual setting.
Reflection: It would have been nice to get a closer up photo however any closer and the camera would not focus.

Day THIRTY THREE / September 13th
Title: Texture Created by You
Technique: Photography
Reasoning: Ive always been intrigued by the texture of glue from a hot glue gun when it dries. It goes from being complete goo to something incredibly hard. Close up, the dried glue almost looks like glass spikes.
Process: I created this texture using a hot glue gun on a black piece of cardboard.
Reflection: I thought this was a pretty creative idea compared to my original photo of a cupcake I baked.

Day THIRTY FOUR / September 14th
Title: Pattern Drawn by You
Technique: Pattern tool in adobe illustrator.
Reasoning: These pop art graphics are images that I created for an upcoming conference for work. I choose to create a pattern out of these images as I thought this could be a pattern that my work could actually use for this upcoming conference.
Process: I took the images and placed them evenly around a 300 px by 300px square in adobe illustrator. I then used the make pattern tool under the object tab to form the repeating pattern.
Reflection: This pattern looks like it could be used as wrapping paper.

Day Thirty Five / September 15th
Title: A Pattern from Nature
Technique: Photography
Reasoning: Whilst it kinda look like no thought was put into this image, I actually took quite a few pictures of patterns in nature however this was my favourite out of them all. While it is very simple and there is little repetition in the image, there are elements in the photo that are receptive such as the cigarette buds and sticks which make me believe it is a pattern. I like how this pattern in nature is kinda created by a number of different things occurring.
Process: Photography using my DSLR cannon camera using the close up setting.
Reflection: I found it quite hard to distinguish the difference between a texture and pattern in nature.
Week 9 / Image Manipulation


Day Thirty six - forty / September 18th-22nd
Title: Ancient Ruins
Technique: Image Manipulation
Reasoning: With little experience in photoshop, I was initially quite confused and scared about what to do for this week's topic of image manipulation. To get a greater understanding of what image manipulation referred to, I looked at existing work on the web which led me to work done by a designer called Radio Arts. This guys art work focuses mainly on image manipulation, with a dark landscape theme in particular, which i thought looked pretty cool. Using this guys work for inspiration I used my existing photo of a sphinx like character to create an ancient ruins type of image.
Process: I used the image of the sphinx looking structure as the base photo by firstly removing the blue sky/tress using the quick selection tool and creating a mask layer. I then took the image of the dark clouds and placed it behind this first image layer. Using the direct selection tool again, I created a mask of the mountains in the second photo and placed this image layer between the previous two. I then used the direct selection tool again to create a mask of the pavers in the first image and the sand in the third image, which I then overlaid on top of the sphinx photo.
Reflection: I think that the selection of images I choose for the image manipulation actually worked quite well together in the end, even though separately they look very out of place. In terms of challenges I faced a few issues with the selection tool in Adobe Photoshop which meant that I had to redo some of the masks a few times. I don't know what happened with the program but I had to turn my computer off to fix it and start the image over again.

